Watercolor Fall Floral & Golden Frames: Practical Ways to Avoid Missteps and Create Beautiful Autumn Projects
Hand-painted botanical illustrations have a timeless charm, and when you pair soft watercolor fall florals with elegant golden frames, you get something truly special. This type of digital art set typically includes yellow chrysanthemums, muted forest leaves, warm autumn blooms, and ornate gold frames — all on transparent backgrounds so you can layer them freely. Whether you’re crafting Thanksgiving greeting cards, designing wedding invitations, making stickers, decorating a planner, or building a seasonal blog header, these assets give you the look of high-end stationery without needing to paint a single petal yourself. Yet many people jump into using them without fully understanding what they’ve downloaded. The result can be blurry prints, mismatched colors, or wasted paper. A little upfront knowledge can completely change that.
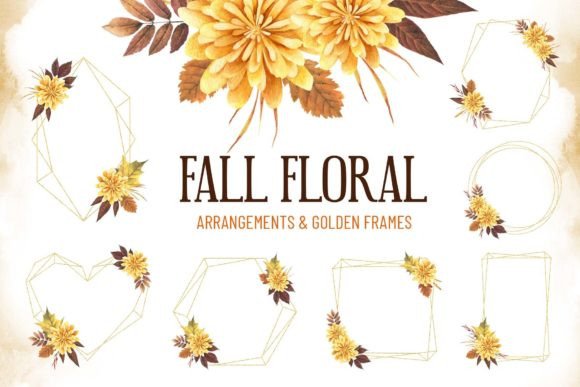
One of the most overlooked details with sets like Watercolor Fall Floral and Golden Frames is the sheer flexibility of the format — but only if you respect the file properties. A bundle that includes 26 PNG files, with 7 pre-made arrangements, 12 individual floral bouquets, and 7 golden frame options gives you both ready-to-print compositions and the pieces to build your own. The transparent backgrounds mean you can place a delicate chrysanthemum spray over a textured card, or tuck a golden frame around a photo without a white box ruining the design. But this flexibility also invites mistakes that are easy to correct once you’re aware of them.
Why People Overlook the Real Value of Transparent PNGs
It’s common to see beginners treat every PNG like a finished JPEG — dropping it onto a white canvas and calling it done. That misses the whole advantage. When a hand-painted fall leaf or a golden frame sits on a transparent background, you can layer it over wood textures, kraft paper, fabric swatches, subtle watercolor washes, or even other frames. If you don’t leverage that transparency, your designs can feel stiff, and you lose the organic, layered look that makes watercolor fall floral compositions stand out. Instead, try importing the bouquet into a project that already has a soft linen or watercolor paper background. You’ll immediately see the difference: the bouquet breathes, and the gold frames catch light instead of flatly sitting on white.
Avoiding the Resolution Trap
A major frustration happens when someone tries to stretch a small PNG to fill a large invitation or canvas. Digital watercolor elements — especially those with fine brush strokes and delicate leaf veins — can lose their crispness quickly if scaled beyond their intended size. Many assume that “transparent PNG” automatically means “enlarge without limits.” That’s not true. Before you drag a golden frame onto a 12×16 inch scrapbook page design, check the actual pixel dimensions of the file. If you need a larger print, scale your whole project down or combine smaller elements in a way that hides any softness. Pre-made arrangements are often optimized at a certain size, so using them as intended usually gives the sharpest result. When you create your own design, use the individual bouquets and frames at a similar scale to what you see in the listing previews for the cleanest output.
Color Mode Confusion: The RGB vs. Print Reality
One of the quietest yet most impactful oversights is ignoring the color mode. These files come in RGB color mode, which is standard for screens. But if you’re designing for print — greeting cards, physical stickers, or photo book pages — your screen’s bright, backlit colors will not match the ink on paper exactly. Those soft watercolor washes of mustard yellow, burgundy, and burnt orange might print slightly duller or shift hue if you don’t manage expectations. This doesn’t mean you can’t print beautifully; it means you should test print a small element on the same paper you plan to use, and adjust your printer settings or slightly boost saturation if needed. If you need precise color matching for a brand or event, convert the RGB designs to CMYK in your software and know that a slight tonal shift is normal. The golden frames especially look different on screen versus in print — on screen they gleam, but on paper they rely on warm yellow-brown tones to suggest metallic sheen. Understanding this avoids that “it looked brighter online” disappointment.
The Unspoken ZIP File and Software Hurdle
Purchasing a beautiful set of Watercolor Fall Floral and Golden Frames only to open a ZIP file and see a jumble of folders can stop some less tech-savvy creators right there. The note that files come in ZIP format and you must know how to unzip them sounds obvious, but many tablet users or those on restrictive work laptops struggle with this step. Worse, they might try to open a PNG in a program that doesn’t support transparency (like some basic photo viewers) and think the file is broken or has a white background. Always use software that respects PNG layers — applications like Photoshop, Affinity, Canva, Procreate, or even free tools like GIMP and Photopea. If you’re designing a Thanksgiving place card or a blog graphic, confirm your program can handle high-resolution transparent images before you start. This simple check prevents hours of frustration.
Not Organizing Your Assets Wastes Creative Time
With 26 files, it’s tempting to dump them all into one folder and scroll endlessly each time you need a specific autumn leaf or chrysanthemum bouquet. After a few projects, you start grabbing the same obvious arrangement repeatedly while ignoring the hidden gems. Spend ten minutes creating subfolders: one for golden frames, one for individual florals, one for pre-made compositions. If you like to create your own design — maybe layering a yellow chrysanthemum bunch with a spray of forest leaves and a thin gold border — pulling from categorized files makes the process almost meditative. This small step turns a scattered asset folder into a personal design kit you’ll reach for every fall season.
Misusing Pre-Made Arrangements and Golden Frames In Combination
Some buyers assume the 7 arrangements and 7 golden frames are meant to be used exactly as shown, but they can be remixed endlessly. A common misstep is forcing a large rectangular gold frame over a square floral arrangement in a way that clips the flowers awkwardly. Instead, use the transparent background to your advantage: place the frame first, then tuck the bouquet partly outside the frame’s border so leaves and petals break the boundary. This simple trick creates depth and a more editorial, high-end invite look. Or take a golden frame, scale it down, and use it as a label accent for a scented candle jar design. The frames are not just picture borders; they’re clipart elements that can become elegant backdrops for text or delicate dividers on a stationery set. When you think of them as design elements rather than rigid frames, your projects become distinctive and less template-like.
Forgetting About Print Bleed and Edge Safety
If you’re making home decor prints or greeting cards that extend to the edge, floral bouquets and watercolor leaves placed too close to the trim line might get cut off at awkward points. It’s a tiny detail that transforms a professional-looking card into something obviously homemade — and not in a charming way. When using these watercolor fall floral compositions, give yourself at least a quarter-inch safety margin inside the cut line. The golden frames, however, can work beautifully right up to the edge if you want a bordered look, but double-check that the frame’s thinner decorative elements don’t get sliced. Test with a trim guide overlay in your editing software. This is especially crucial for stickers and labels where precision matters.
Practical Uses That Go Beyond the Obvious
Many people think of Thanksgiving greeting cards and scrapbooking first, but the versatility of this type of hand-painted botanical set extends far further. Use a single golden frame as an overlay for a fall recipe card on your blog — the transparent background lets your food photography peek through while the watercolor chrysanthemums soften the edge. Layer a few forest leaves in a repeating pattern for a website header that changes with the season. Print a bouquet onto clear sticker paper, cut it out, and apply it to a glass candle holder. Create matching wedding elements: save the date, invitation, menu, and thank-you tags all using pieces from the same set for cohesion. The key is to let the elements support your project rather than overwhelm it. A delicate yellow mum placed next to a calligraphy name can say more than a full complex arrangement.
What to Check Before You Use or Purchase a Set Like This
Not all digital floral sets are created equal. Before you invest time creating something, verify the actual pixel dimensions and that the transparent backgrounds are truly clean — sometimes there are faint white halos around intricate leaves that become visible on dark backgrounds. For a set that mentions ready-to-print arrangements, confirm the resolution is at least 300 DPI at the intended print size. If the files are smaller than you need, you might still use them beautifully on web graphics, planner stickers, or small labels where scale is forgiving. Also, be realistic about your available tools: if you don’t have software that handles PNG transparency, a downloadable that relies heavily on that feature will frustrate you. Most modern programs — even free ones — handle it, but it’s worth confirming. Finally, note again that these are digital downloads with no physical product shipped. Having a reliable unzipping process and a backup folder system saves you from losing purchased art you might want to reuse next autumn.
Watercolor Fall Floral and Golden Frames assets offer an accessible way to bring hand-painted warmth into all kinds of seasonal projects. When you avoid the common missteps — ignoring transparency potential, scaling recklessly, assuming screen colors match print, skipping software checks, and underusing the variety of pieces — you unlock a level of creativity that feels personal and professional. The 12 floral bouquets, 7 frames, and 7 pre-built arrangements become a flexible toolkit that carries you from a simple blog banner to a layered, tactile greeting card. Treat these elements like real art supplies: handle them with some basic technical knowledge, and they’ll reward you with rich, autumn-inspired results that look anything but generic.